官方文档:https://hexo.io/zh-cn/docs
安装环境
- 安装node和git环境
- 安装hexo
npm install -g hexo-cli - 初始化
1
2
3
hexo init <folder>
cd <folder>
npm install
配置
修改配置文件
1 | # config.yml |
运行
1 | hexo -g |
上传
hexo -d
域名配置
1 | // 用的万网域名 |
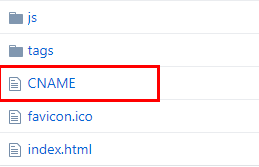
中间遇到github pages报错,原因是没有把CNAME文件放到source目录下,生成之后github上没有这个文件。
更换主题
编辑文章
- 新建文章
hexo new <title>
将在source目录下生成<title>.md
编辑时按md文件规则编辑 - 新建菜单栏
以about页面为例:hexo new page about
将source/about/index.md文件内的type改为about,如下:1
2
3
4---
title: about
type: "about"
---
定义自己的博客
添加看板娘
安装依赖包
1
2
3npm install --save hexo-helper-live2d
# 添加自己想选择的模型
npm i live2d-widget-model-nipsilon模型列表:https://github.com/xiazeyu/live2d-widget-models
在线演示地址:https://huaji8.top/post/live2d-plugin-2.0/_config.yml配置:
1
2
3
4
5
6
7
8
9
10
11
12
13
14
15
16live2d:
enable: true
scriptFrom: local
model:
use: live2d-widget-model-nipsilon
display:
position: left
width: 150
height: 150
mobile:
show: false
react:
opacityDefault: .8
dev:
log: true
mouseLog: true按需配置:
参数说明:
https://l2dwidget.js.org/docs/class/src/index.js~L2Dwidget.html
了解更多的话可以看张鑫旭大神的文章哦:https://www.zhangxinxu.com/wordpress/2018/05/live2d-web-webgl-js/- 自定义菜单
1
2
3
4
5
6
7
8
9
10
11
12
13
14
15
16
17
18
19
20
21
22
23
24
25
26
27
28
29var dialog = `
<div class='dialog'>
<div class='words'>你好(〃'▽'〃)</div>
<div class='menu'>
<ul class='menu-list'>
<li><i class='fa fa-home'></i></li>
<li><i class='fa fa-music'></i></li>
<li><i class='fa fa-comment'></i></li>
<li><i class='fa fa-camera'></i></li>
<li><i class='fa fa-info-circle'></i></li>
<li><i class='fa fa-times-circle'></i></li>
</ul>
<ul class='menu-music'>
<li><i class='fa fa-play-circle'></i></li>
<li><i class='fa fa-pause-circle'></i></li>
</ul>
<div>
<div>
`
setTimeout(() => {
$('#live2d-widget').append(dialog)
}, 1000)
$('.menu-list').on('mouseenter', 'i', (e) => {
// 添加hover事件
})
$('.menu-list').on('click', 'i', (e) => {
// 添加点击事件
})
添加音乐播放器
插件:https://aplayer.js.org/#/
添加插件后目录链接无法点击问题:
将这一句代码去掉就可以了1
if(!e.defaultPrevented){e.preventDefault(),location.hash!==this.hash&&window.history.pushState(null,null,this.hash);var n=document.getElementById(this.hash.substring(1));if(!n)return;t(n,500,function(e){location.replace("#"+e.id)})}
自定义模板
以本博客所用的主题Maupassant为例, 其中历史页面使用了一个时间轴
从_config.yml配置文件可以看到:1
2
3
4
5
6
7
8
9timeline:
- num: 1
word: 2014/06/12-Start
- num: 2
word: 2014/11/29-XXX
- num: 3
word: 2015/02/18-DDD
- num: 4
word: More
同时在主题的模板目录下有一个timeline.pug文件, 里面内容为:1
2
3
4
5
6
7
8
9
10
11
12
13extends base
block title
title= page.title + ' | ' + config.title
block content
// ...some code
- for (var i in theme.timeline)
div.timeline-entry
div.timeline-entry-inner
div(class="timeline-icon wow fadeInUp" data-wow-delay="0.2s")
span.number= theme.timeline[i].num
div(class="timeline-label wow fadeInUp" data-wow-delay="0.2s")
span.word= theme.timeline[i].word
// ...some code
使用timeliness这个组件只需要在md文件的front-matter中添加layout: timeline
这样就很清楚啦,在配置文件中定义变量,在模板中读取,写文章时修改layout就ok了( • ̀ω•́ )✧
所以自己来写一个吧! (以本博客的关于页面为例,页面下方的联系用了自己的模板)
首先新建一个文件
about.pug
内容类似:1
2
3
4
5
6
7
8
9extends base
block title
title= page.title + ' | ' + config.title
block content
// ..some code
- for (var i in theme.about)
a(href=theme.about[i].href, title=theme.about[i].name)
i(class='fa ' + theme.about[i].icon)
// ...some code配置文件添加变量
形式可以自己定义,只要模板文件遵循格式就好啦(~ ̄▽ ̄)~1
2
3
4about:
- name: github
href: https://github.com/amenging
icon: fa-github修改md文件的
layout为about
添加emoji
1 | npm un hexo-renderer-marked --save |
中间如果执行有错误先运行hexo clean哦_config.yml添加1
2
3
4
5
6plugins:
- markdown-it-footnote
- markdown-it-sup
- markdown-it-sub
- markdown-it-abbr
- markdown-it-emoji
emoji网站:https://www.emojicopy.com/
其它
清除public目录
hexo clean
rss订阅
npm install hexo-generator-feed --save
在_config.yml下添加1
2
3
4
5
6
7
8#RSS订阅
plugin:
- hexo-generator-feed
#Feed Atom
feed:
type: atom
path: atom.xml
limit: 20
当然_config.yml的menu里也要添加1
2
3- page: rss
directory: atom.xml
icon: fa-rss
创建404页面
hexo new page 404
这样就可以啦,github会把它作为默认404
不过听说要绑定域名哦
添加gittalk
github的设置在”settings/developers”
